Friday, November 3, 2017

#eyebombing activity for Narrative Writing

Ok, so I've never considered myself an expert in ELA.  I've always been that geek who loves math, science and technology.  However, I came across this #eyebombing movement that may have changed that just a little bit, so I immediately had to share with you.  The purpose of #eyebombing was started as a way to create smiles on people's faces. Googly eyes are placed on inanimate objects to create a face. What better way to address point of view and perspective in narrative writings than to have students create their own characters?  What kind of stories could they create? Then, in the process, spread a little joy across your campus. I can only imagine the reaction of someone trying to drink from a water fountain with a face on it.  It's a win-win, in my opinion.

I adapted my lesson directly from Gina Ripley.  You can follow the hashtag #eyebombing on Twitter to see how other teachers are adapting this project in their classrooms.  You can also access the lesson and resources here.  I can't wait to see how creative your students will get.  Share their creations with me on Twitter by including @rfluegel and the #eyebombing hashtag.  I will love to see all those characters come to life.

Happy #eyebombing!

~Rosie F.

Tuesday, October 24, 2017

Magnetic Poetry with Google Drawings

Halloween is just around the corner and your kids are getting a little scary.  Take advantage of that extra energy and try a little magnetic poetry using Google Drawings to get your kids to show their spooky creativeness.  

Thanks to the Shake Up Learning blog, who created this awesome Google Drawing template, you can spark your little monsters' creativity with magnetic poetry.  There are almost 100 tiles in this template, but of course, you can delete tiles or add tiles using text boxes in order to adjust to student vocabulary levels. Simply drag a tile onto the page to create a poem. You can either use this as a collaborative activity or an independent activity.  You could also use it as a writing prompt.  Regardless, how you decide to implement it in your classroom, I would love to see their creations.  Feel free to tag me on Twitter @rfluegel.  I'm sure their creativeness will be spooktacular.
~Rosie Fluegel

Monday, October 9, 2017

Quick & Easy Videos with Biteable.com


As teachers, we love to see beautiful multimedia projects from our students.  However, there are times when we would love to see what our students can create without spending too much of our time working on a more complicated app.  In comes Biteable.com, the world's simplest video maker.  In just a few simple steps you can have your own animated video ready to go. Simply pick your favorite scenes from their selection, add text, pick a theme color and choose music. Then, you're done.  Watch the video below to learn how to create your first video using biteable.com. 


What I like about biteable.com is that students are forced to a use a limited amount of text depending on their chosen scene.  This forces students to be concise with their thoughts or ideas.  I do have to note that the final product cannot be downloaded to your computer and there will be a watermark in the corner of your video. However, you can link to your video or embed it on another site.  You can create a free account by using your Google account, so getting started is even easier.  It's definitely worth looking into if you or your students are looking for a video creation tool that is new, quick and easy.  Give it a try and let me know what you think.

~Rosie F.

Tuesday, August 29, 2017

2017-2018 Welcome Back Post!

So, here we are again.  Welcome Back! The 2017-2018 school year has just started with a bang.  It has been nice to see all the little ones getting back into the swing of things so quickly.  Soon I will be travelling from campus to campus, as usual, working with teachers and their instructional technology needs.  This year I will begin by sharing Apple Classroom 2.0 with all of my campuses. Although we have had managed student iPads since last year, this will be the first time we will be able to implement Apple Classroom due to some easing of the infrastructure requirements.
Get the Classroom app here.
Apple Classroom 2.0 provides a range of features including observing student screens, launching apps and URLs, locking a device, muting devices and even sharing documents via AirDrop. To get started the teacher must have the Classroom app installed. With Apple Classroom 2.0 there are two ways to get started with Classroom.  The first is the managed version where your student and classes are managed by your school's MDM.  With the new version, teachers can now create ad-hoc classes. This allows teachers to take advantage of the Classroom features without having to adhere to the strict parameters of the MDM.  Of course, there are pros and cons to either set up and it really depends on each school district's mobile management system on which method you choose. Regardless, for teachers in an iOS environment, Apple Classroom makes a difference in the classroom workflow.

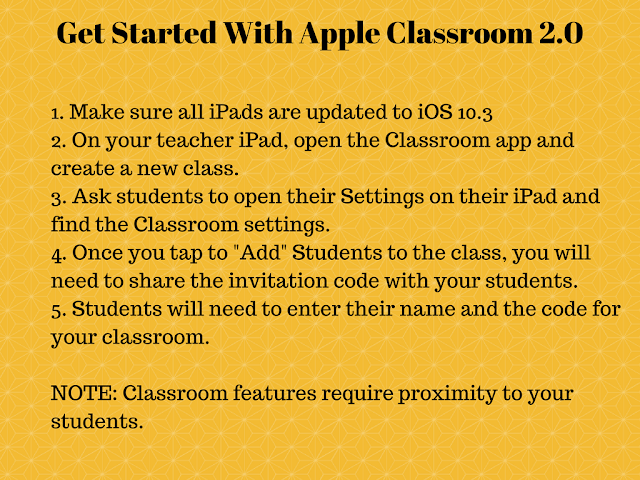
For those teachers ready to explore Apple Classroom 2.0, I've created a quick five step guide.  You can also read more from Apple here.


Thursday, May 11, 2017

Mother's Day Coding Project

Mother's Day is right around the corner and no doubt we will see all sorts of amazing projects coming out of the classrooms this week.  As a mom, it has always been something I look forward to during the year.  However, this year I've found a great opportunity for teachers to integrate coding into a Mother's Day project using the Tynker website.  

Your students can use coding to create a Mad Libs-style story for their mothers (or anyone, for that matter.)  The result is a funny and sweet tribute to their mothers.  What a wonderful way to integrate coding into your Language Arts class. 

Students can choose to apply their knowledge of grammar and storytelling to craft a story such as the one found here.
Another option for students is to create a customized digital card like the one found here.

Regardless which project students choose, I'm positive there will be a lot of impressed mother's out there.  Teachers can sign up for free on Tynker to access these projects and the tutorials.  Also, take a look at Tynker's Four Reasons Why Kids Should Learn to Program article.  It's a great reminder of the importance of coding skills for our students' future.

I hope you and your students enjoy "Tynker"ing this week and Happy Mother's Day to all teachers that are mothers at home, as well. 

~Rosie 

Wednesday, May 3, 2017

NEW! Connected Posts in Padlet

I was so happy to see that Padlet has included the ability to connect posts in their Freeform Layout.


The connectors are simple, neatly drawn arrows and you have the ability to place a label on them.  It's a great way to create simple flowcharts, infographics and other organizational charts in a collaborative environment.  


You can set one up in just a few easy steps:

1. Start with a Freeform Layout.
2. Make sure you have more than one post on your Padlet.  You do need to connect to something after all.
3. Visit the note's [...] menu and choose to "Connect to a post."
4. Choose which note you will connect and add your label text if needed.

I hope you enjoy using this simple new addition to Padlet and if you haven't tried Padlet yet, then head on over to https://padlet.com/ to learn more and sign up for a free account.


If you have great Padlet ideas for the classroom, please share with me in the comments below.


~Rosie


Friday, February 17, 2017

Free Phonics from ReadingBear.org

I've had several early education teachers reach out to me about phonics lessons for students. I've recently discovered Readingbear.org and I believe for many of these teachers it may fit the bill. 

As stated on their site,
Reading Bear, a project of WatchKnowLearn.org, is the first free program online to teach beginning readers vocabulary and concepts while systematically introducing all the main phonetic patterns of written English, all using innovative rich media. 
The site has 50 presentations (with more being planned) which offer several viewing options. Reading Bear can be used on computers, laptops, and iPads if using the Puffin Browser.
After a student has reviewed a letter, they can take a quiz.  You do not need an account to use the lessons, but if you have an account the results can be saved.  Teachers can create an account and then create subaccounts for their students. 

Again, this is from a free, non-profit organization and definitely worth investigating further if you are an early education teacher. This is also a great resource for parents of young children.  Give it a try and let me know in the comments what you think.
~Rosie Fluegel


Monday, January 16, 2017

Differentiate Instruction Using Google Classroom

We all know how important differentiation is to the success of all students in a classroom.  So, naturally, when choosing technology I'm always looking for ways we can do that easily.  Today, I want to quickly share how you can easily choose students from within your Google Classroom to receive differentiated instruction.  

When creating an assignment in Google Classroom, you have the option to post it to more than one classroom. Then, directly to the right you will see the option to select which students will see your assignment.  By default, your assignments will post to all students. However, it's nice to know you can select individual students to receive a modified assignment.

This is definitely an easy solution to differentiate your online instruction.  Comment below if you know of other solutions to differentiate instruction using Google Classroom.

~Rosie Fluegel
___________________________________________________________

Apple Learning Specialist | Google Apps For Education Certified Trainer | @rfluegel